How-To Guide
How to Install Grand Slam Baseball and Softball Field Fencing
July 07, 2016

Portable fencing is perfect for sectioning off space for your baseball or softball field, local park, or school playing fields. Grand Slam Fencing is one of the best on the market for portable outfield fences. It’s soft, yet durable, and comes in a variety of colors and add-on options to make any old field into a ballpark, concert venue, event space, and more. Whether you’re thinking about or have already purchased your Grand Slam Portable Fencing, you’re prioritizing safety, quality and aesthetics of your field, providing an environment that athletes and spectators alike will appreciate.
Easy to set up and convenient to tote around, Grand Slam Fencing is scoring home runs around the country. With proper maintenance, your temporary fencing will serve your needs for years to come. See for yourself how easy it is to install with the quick Grand Slam Fencing installation steps below. You’ll be up and swinging in no time.
What Do I need For My Temporary Outfield Fence Installation?
With our temporary fencing solutions, you have the option to purchase in-ground or above ground installation kits. They offer the durability of permanent fences but are easier to install and break down.
In-Ground Grand Slam Fence Kit Contents
Please note that this guide assumes the ground is already prepared and suitable for in-ground installation. If your site requires leveling or other prep work, you may need to complete that before starting the installation of your in-ground Grand Slam fencing.

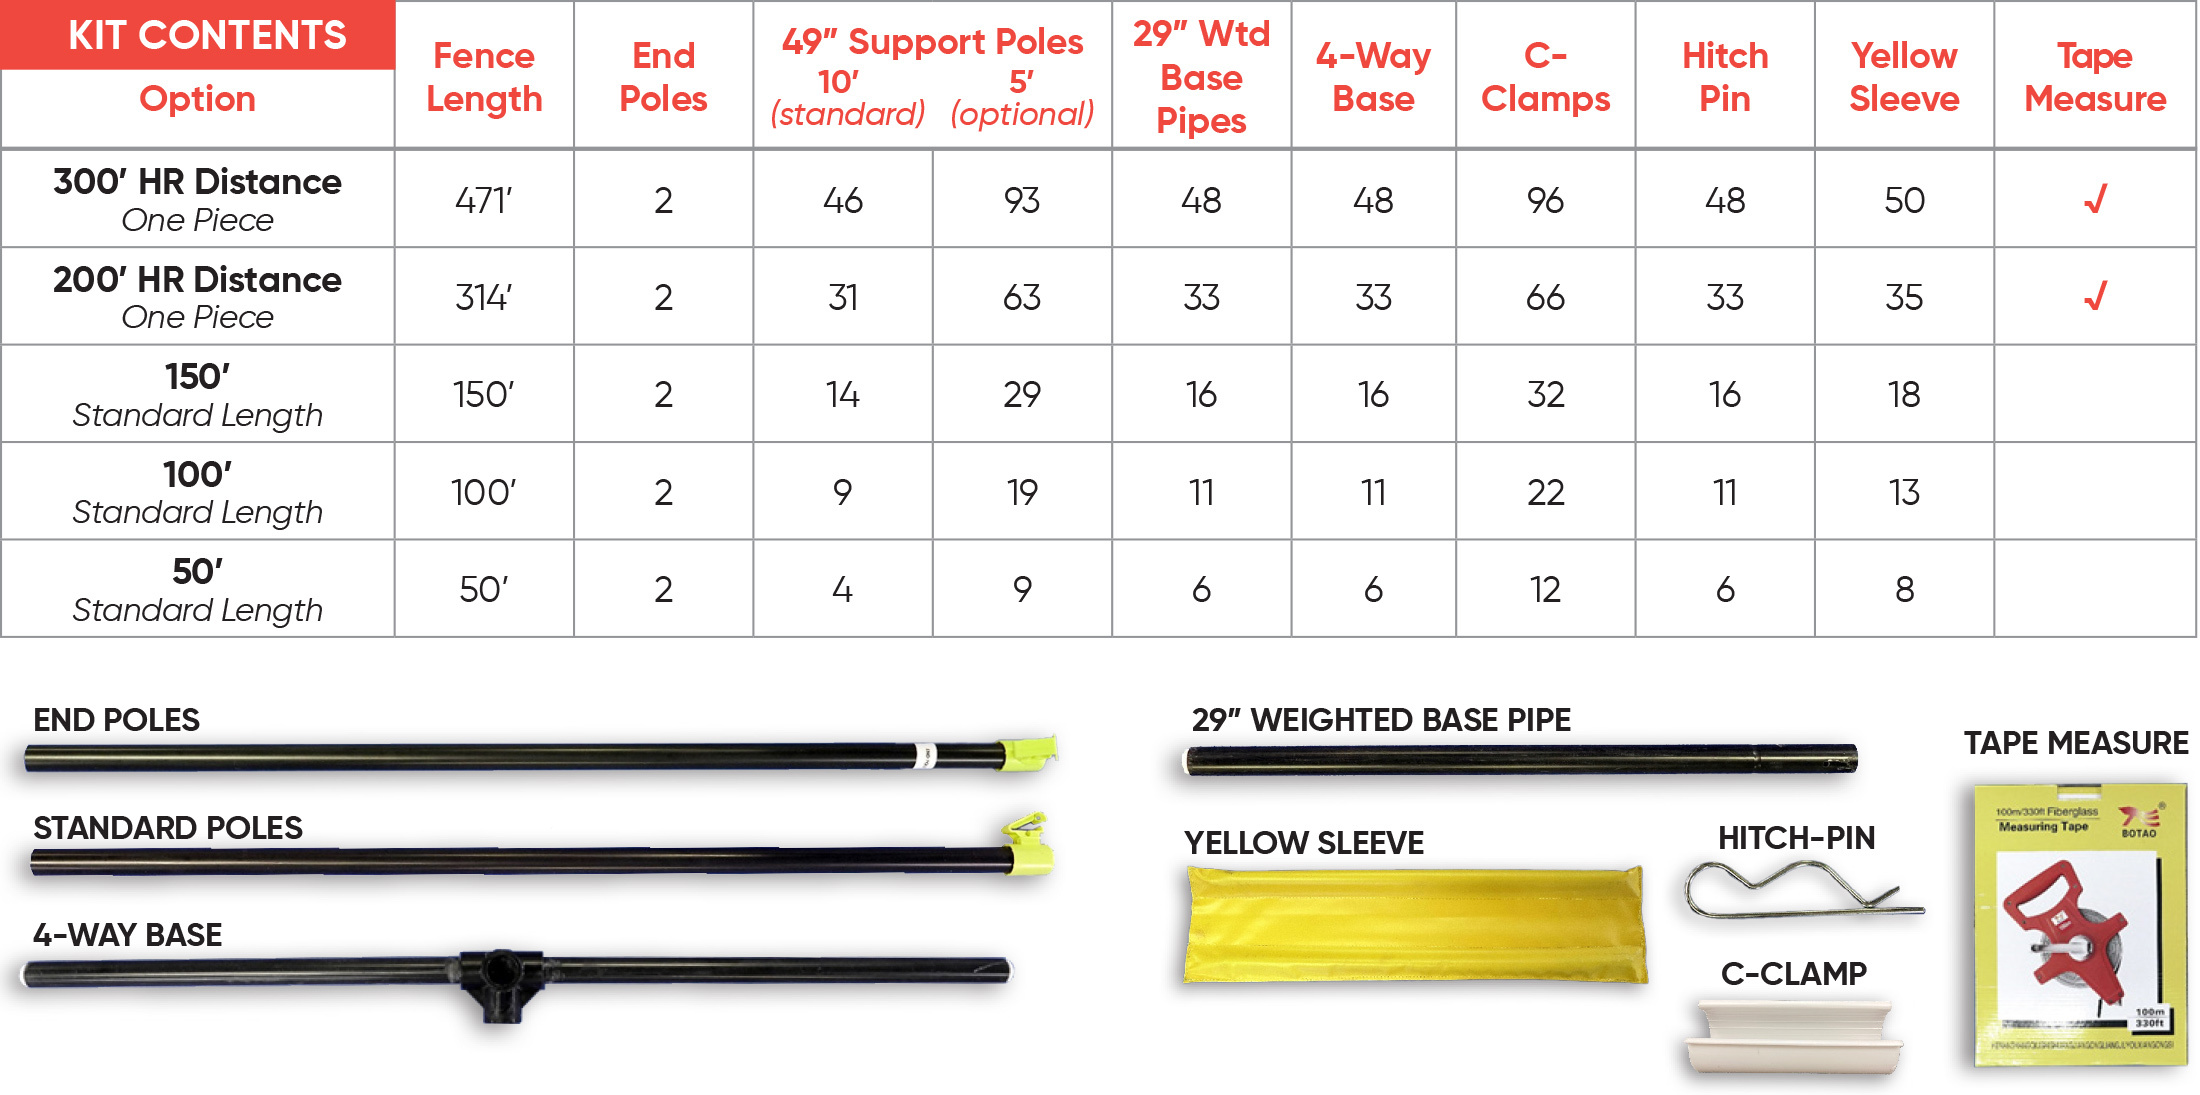
Above Ground Grand Slam Fence Kit Contents
Grand Slam Fencing Installation Instructions
Both temporary fencing options begin installation the same way:
1. Roll out Grand Slam Fencing along the line where it is to be installed.


2. Slide poles through loops (or pockets) woven into the fence (See image A). Insert each pole, starting from the slot closest to the yellow top and continuing through the three remaining slots (See image B).
Note: Standard pole interval is 10’ (every other slot). Slots are woven every 5’ if additional poles are ordered/desired. For 200’ and 300’ HR distance kits only, end poles are specially reinforced and marked with a white sticker.


3. Attach the yellow fence slots through the latch on the endcap of each support pole.
Above Ground Grand Slam Portable Fencing Installation


4. Complete assembly of weighted base units - connect 29” pipe to 4-way base with hitch-pin. Insert 29” pole into pocket in center of weighted yellow pouch.


Note: Each end pole utilizes 2 weighted yellow pouches that are designed to be outside of the playing/walking area.


5. Begin setting up the fence by inserting one end pole into the base starting at one end. Insert poles into weighted base units one-by-one along entire length of fencing. Pull fence taut at each pole to remove sag.


6. C-Clamps attach to the base pipe in order to hold the fence taut at bottom. Install 2 clamps on each base pipe (one near each end).
Note: Wind force and contact from players or equipment will move poles slightly. Periodically adjust poles to remove sag and achieve best appearance.
In-Ground Grand Slam Portable Fencing Installation


4. Mark location for first pole and drill a hole using the included auger.
Note: If you purchased the optional Socket Kit, see the addendum at the end for additional instructions.


5. Insert the first pole approximately 12” into the ground, using a rubber mallet. Do not hit the pole or socket directly with a metal hammer. The first pole should be installed leaning slightly into foul territory (away from fence) to provide additional tension as the remaining poles are installed.


6. Continue installing the rest of the fence one pole at a time until the entire section is installed. The last pole should again be angled slightly into foul territory to keep the fence as taut as possible.
Note: Pre-drilling all the holes before installing the fence may result in fence sagging.
7. If there is extra fence beyond the edge of your field, you can trim the ends.
Safety Tips for Field Fence Installation
1. Always break down pole assemblies. Break down and store flat to minimize breakage (and use less space). Damage from improper storage is not covered under warranty.
2. Never step over or under an installed fence. Always walk around. Poles and fittings can break if bent backward repeatedly. This type of damage is not covered under warranty.
Safety Tips for In-Ground Temporary Fence Installation
1. Always wear protective gear during installation. Wear safety gloves and goggles, especially when handling tools or heavy materials.
2. Double check measurements and know before you dig. Before digging, make sure you have the correct measurements and take care not to disturb any underground utilities.
How to Store Grand Slam Fencing
Storing your temporary baseball or softball field fence is even easier than installation. To store, simply remove poles from ground (or sockets) and roll fence as pictured. No need to remove the poles from the fence itself. If using sockets, be sure to cap sockets after removal.

Socket Kit Installation for Portable In-Ground Fencing
Note: Do not pre-install sockets for support poles. Mark and install each socket one at a time for best results.

1. Mark the location for the first pole and drill a hole for the first socket. Angle it slightly away from field of play to provide additional tension (angle end pole only).
2. Place socket into pilot hole. Insert socket driving tool into socket and drive into turf with a rubber mallet (not included). Remove tool and proceed to the next step.
3. Insert the first pole securely into the socket.
4. Repeat for all poles, one at a time, according to the instructions above.
Note: Be sure to use socket cap when not in use to prevent clogging and/or damage.
CoverSports
5000 Paschall Avenue
Philadelphia, PA 19143, USA

